
When I first started selling on Etsy, my product photography was… bad. Like, shot-on-my-counter-with-a-kitchen-light bad. And it showed. My listings weren’t getting clicks. My views were tanking. Even I wouldn’t have bought my own stuff.
But I didn’t have a fancy studio. I had a small guest bedroom, a tight budget, and zero photography experience. So I decided to figure it out.
Here’s how I transformed that tiny room (and my whole Etsy shop) with a DIY product photography setup that works. If you’re a seller struggling with bad lighting, cluttered backdrops, or inconsistent photos, this is for you.
This article is part of our series, Everything You Need to Know to Succeed on Etsy. If you’re new here, check out the full guide or jump into other topics at the end of this post.
Key Takeaways:
- ✅ You don’t need a professional studio to take high-quality Etsy product photos—just smart use of lighting, space, and simple gear.
- 💡 Natural light is your best friend. Finding the right window and using basic reflectors can instantly improve your photos.
- 🎥 Lifestyle photos and videos increase clicks. Show your product in use and behind the scenes to build trust and boost conversions.
Table of Contents
- Step 1: Finding the Light
- Step 2: Creating a Consistent Backdrop
- Step 3: Choosing the Right Gear
- Step 4: Capturing Lifestyle Shots
- Step 5: Adding Etsy Listing Videos + Behind-the-Scenes Content
- Step 6: Editing and Exporting
- Step 7: Final Touches for Etsy Visual Branding
- Over to You: Final Advice for Sellers
Step 1: Finding the Light
When I finally got serious about fixing my product photos (even on a budget), I didn’t start with a new camera or a fancy app. I started with light.
Because here’s the truth: good lighting matters more than expensive gear. If your lighting is bad (too yellow, too dark, too uneven) no amount of editing or equipment will save you.
What I Did First
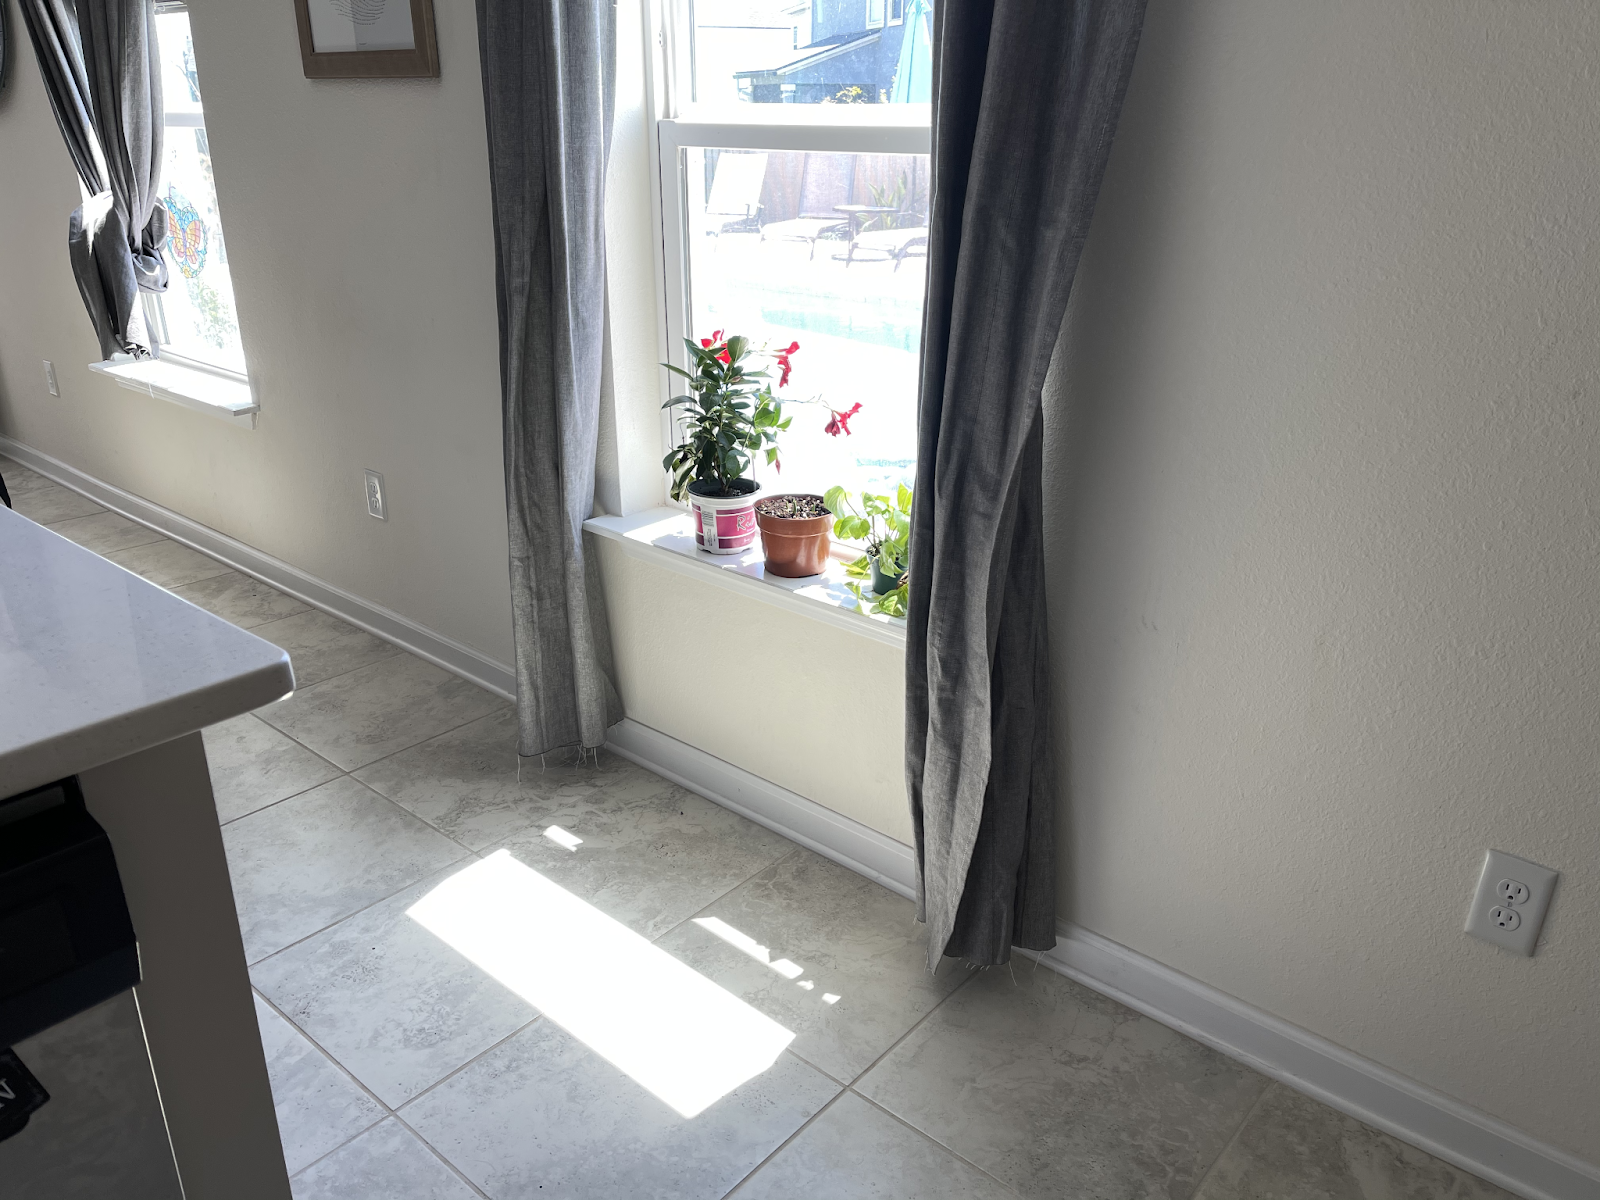
I took my product (a small clay coffee mug) and walked it around the house at different times of the day. I held it up near every window and watched how the shadows fell.
The guest bedroom—of all places—had the best, most consistent natural light from 10 a.m. to 2 p.m. It was east-facing and filled with soft, diffused light that didn’t cast harsh shadows.
Tips to Find the Best Light in Your Home:
- Use north- or east-facing windows whenever possible—they tend to give the softest light throughout the day.
- Avoid direct sunlight. Direct light causes blown-out highlights and harsh shadows that make products look uneven and amateur.
- Time it. The light in your space will shift throughout the day. Snap a few test photos in the morning, midday, and afternoon to find your sweet spot.
- Turn off overhead lights. Mixing natural light with warm interior bulbs messes up your white balance and adds weird color tones to your images.
DIY Light Modifiers I Used:
- Sheer curtain from Target: This diffused the light coming through the window and gave me a softbox effect without buying a softbox.
- White foam board (or poster board): I used this as a reflector to bounce light back onto the dark side of my product. It instantly brightened the shadows and gave my photos more depth.
- Clip-on curtain rod: I added a tension rod to the inside of the window frame so I could hang the sheer curtain without drilling or installing anything permanent.
When Natural Light Isn’t Enough
Not every seller has the luxury of great natural lighting. If your space is dark, or you’re trying to shoot in the evening after work, you can still get solid results with artificial lights.
Here’s what I used when I shot at night:
Entry-Level Option:
- Two clamp lights from Home Depot with 100W equivalent daylight LED bulbs (5000K) – ~$30 total.
- Mount one light at a 45-degree angle on each side of the product to reduce shadows.
- Use white foam board or even printer paper to bounce light back and soften it.
Etsy Pro-Level Option:
- Two softbox lights or LED panel lights with adjustable brightness and color temperature.
- Look for ones that are 5000–5500K (daylight balanced).
- Add a light diffuser or shoot through white fabric for softer shadows.
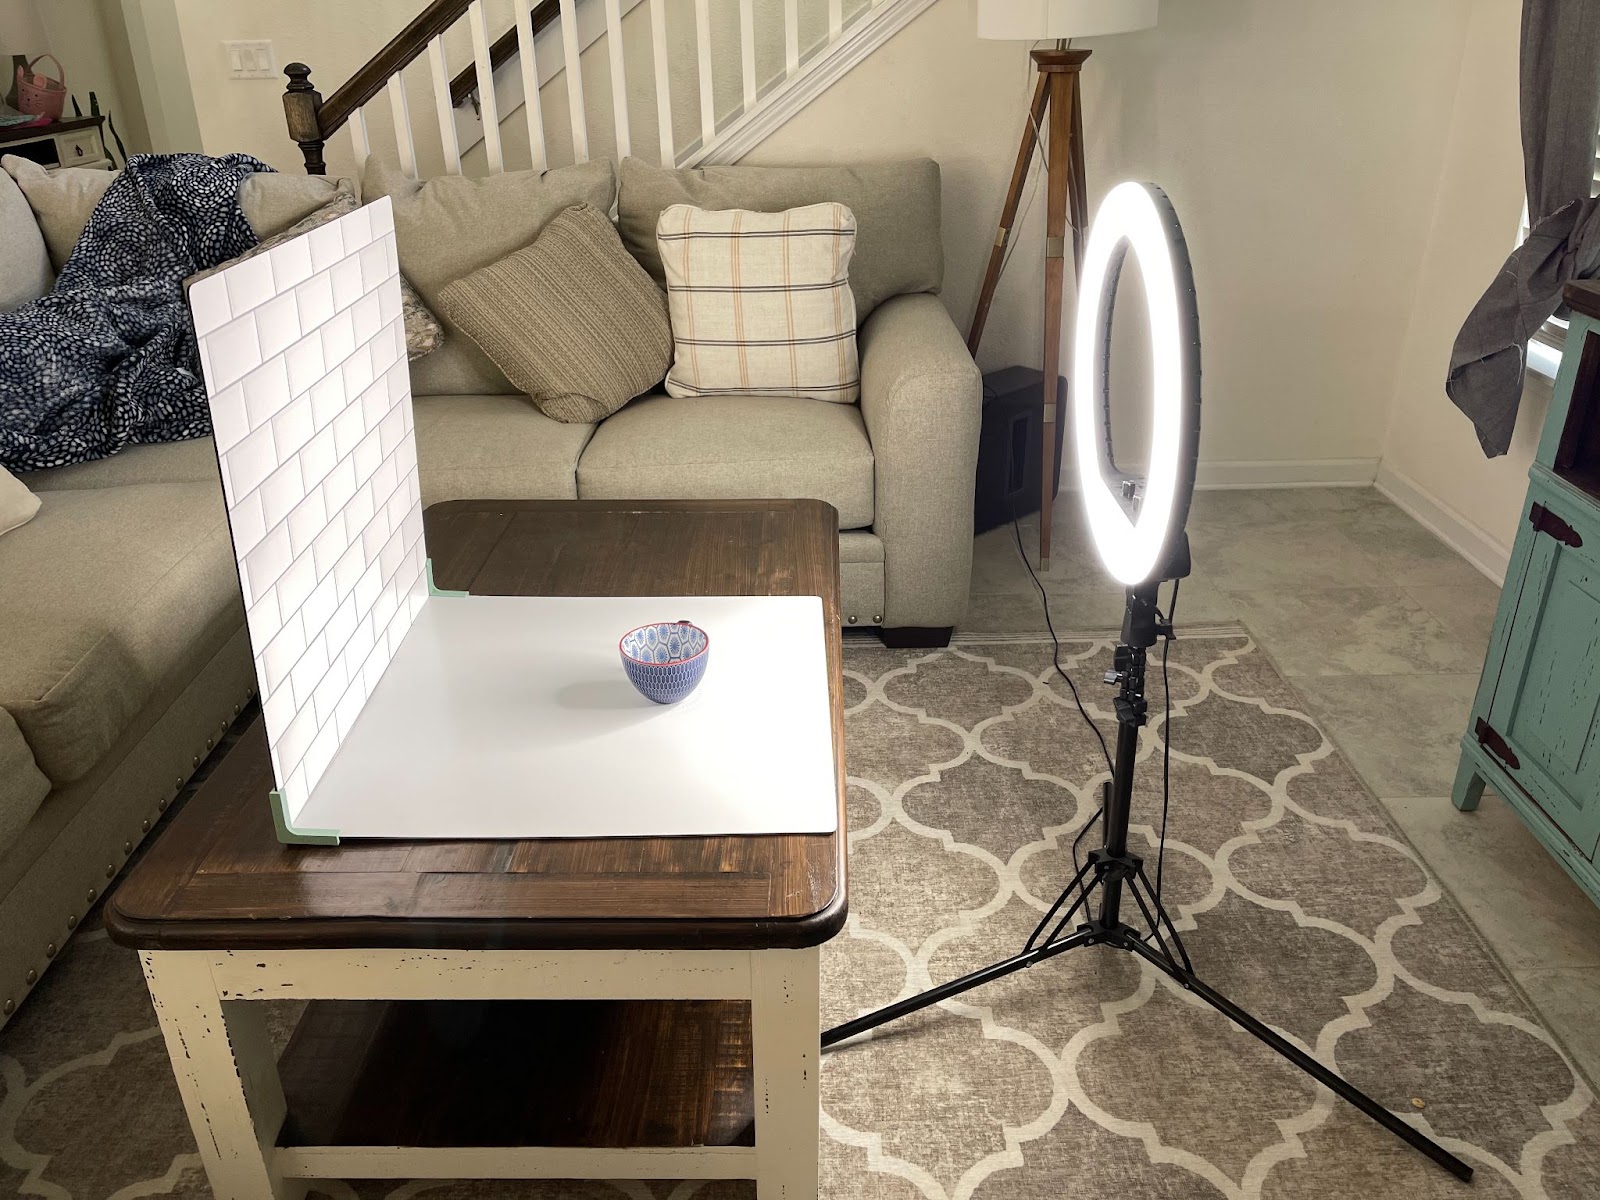
- If you’re really leveling up, invest in a ring light for video or flat lay work.
Bonus Tip: Use Your Phone’s Light Meter
If you’re using an iPhone or other smartphone, tap and hold on your product on the screen to lock focus, then slide your finger up or down to adjust exposure. You don’t want pure white or pure black—aim for detail and balance.
Step 2: Creating a Consistent Backdrop
Once I figured out the lighting, I realized my next biggest problem: my photos looked like they were taken in ten different houses.
One had a granite kitchen counter in the background. Another had a wrinkled bedsheet. One had my dog’s tail in the corner. (Oops.)
If you want shoppers to take your Etsy shop seriously, your product photos need to look like they belong together. That’s where a consistent backdrop comes in.

Why Consistency Matters
Your product photography isn’t just about showing off what you’re selling. It’s about building visual branding that speaks to your target audience. When all your photos follow a similar style—clean background, consistent angles, soft lighting—it sends a subtle but powerful signal: This shop is trustworthy.
What I Used (and Didn’t)
I didn’t go out and buy one of those $200 photography sweep backdrops.
Instead, I used:
- White poster board from the dollar store
- A folding table pushed near my light source (the east-facing window)
- A neutral wall behind the table for clean vertical shots
I taped the poster board to the table and curved it up the wall to create a seamless background. That little curve (called an “infinity sweep”) is what makes your product look like it’s floating in space, without any distracting lines or corners.
Other DIY Backdrop Ideas
If you want to mix it up or create lifestyle scenes, here are some low-cost photo backdrop ideas I tested:
| Backdrop Material | Best For | Notes |
|---|---|---|
| White foam board | Clean, minimal product shots | Great bounce + background combo |
| Peel-and-stick floor tiles | Rustic or textured backdrops | Marble, wood, concrete looks |
| Linen tablecloth | Soft, organic vibe | Perfect for handmade goods, candles |
| Scrapbook paper or poster paper | Small items (jewelry, soap) | Cheap and easy to change up |
| Butcher block cutting board | Food, skincare, rustic vibes | Works great in natural lighting |
Pro Tip: Match Your Brand Style
Think about your ideal customer. Are they into minimal modern? Cottagecore? Boho vibes?
I picked a neutral style with soft textures and glossy tones because my shop focuses on handmade home decor. But you could lean into colorful pastels, dark moody shadows, or natural earth tones depending on what fits your brand.
Just pick a direction—and stick with it across your listings.
A Note on Props
I used to clutter my shots with props to “fill the space.” Big mistake. Less is more.
Here’s my rule now: if the prop doesn’t support the product or tell a clear story, it’s gone.
- Good prop: A candle next to a handmade match striker
- Bad prop: A random succulent next to a mug (what does that even mean?)
Props are just there to give context and show scale. Not to steal the spotlight.
Upgrade Options for Etsy Pros
If you’re ready to invest in your visuals, here are a few pro-level backdrop tools I’d recommend:
- Replica Surfaces: Rigid, wipeable photo surfaces in realistic textures (wood, marble, concrete)
- Savage Seamless Paper: Rolls of high-quality photography paper used in real studios
- Neewer Shooting Table: A translucent acrylic table for light-through-from-below effects (great for glass or jewelry)
Step 3: Choosing the Right Gear
Let’s be honest: when I first tried to fix my Etsy product photography, I thought I needed a $1,500 camera and a cartload of gear to compete.
Turns out, I just needed to use what I already had—smarter.
You can take clean, high-converting product photos using your iPhone and a couple of cheap accessories. And if you’re ready to level up, pro gear can absolutely give you more control. But only after you’ve nailed your lighting and backdrop.
Let me break down the gear I used at each stage—what worked, what didn’t, and what I’d recommend to anyone starting from scratch.
Entry-Level Setup (What I Started With)
Budget: Under $100
Skill Level: Beginner-friendly
Best For: New shops, side hustlers, or sellers with small products
My Essential Kit:
- iPhone 13 Pro: The portrait mode and tap-to-expose features were enough to get started.
- $25 Tripod: A basic Amazon tripod with a phone mount. Huge upgrade over hand-holding shots.
- $30 Clamp Lights: Daylight LED bulbs (5000K) with diffusers made a big difference.
- Free Editing App: I used Lightroom Mobile to adjust exposure, crop, and color match.
Tips That Made a Big Difference:
- Always clean your lens before shooting.
- Lock focus and exposure by tapping and holding on your subject.
- Use the gridlines to straighten your photos (crooked shots look unprofessional).
- Add a timer to avoid blur from tapping the screen.
Etsy Pro-Level Setup (What I Use Now)
Budget: $500–$2,000+
Best For: Full-time sellers, shops with detailed products (like jewelry), or anyone doing video content
My Upgraded Kit:
- Camera: Fuji X-T4 + Sigma 30mm f/1.4 (sharp and beautiful depth of field).
- Lenses: I rotate between 30mm for product shots and 65mm for macros and shallow depth of field.
- Lighting: Two continuous softbox lights with daylight bulbs, placed at 45° angles, and a brightly lit key light to simulate daylight.
- Tripod: Neewer tripod with a horizontal arm for overhead shots and flat lays.
- Editing: Adobe Lightroom for batch editing, color correction, and brand presets.

Bonus Upgrades That Helped:
- Remote Shutter: For triggering the camera without touching it (Fuji has a mobile app that allows your phone to pair with your camera).
- Reflector Set: Includes white, silver, and gold surfaces for fine-tuning light.
- Color Checker Card: To get accurate white balance and make sure my product colors are true-to-life.
What You Don’t Need (Yet)
- You don’t need a DSLR to start.
- You don’t need three different lenses.
- You definitely don’t need a fog machine, glitter, or neon lights (yes, I tried all three… no, they didn’t help).
When to Upgrade
Here’s the truth: don’t buy pro gear until you’ve maxed out what you already have.
If you’re already:
- Getting sharp images on your phone
- Using good lighting
- Editing consistently
- Seeing conversion gains…
That’s when gear becomes a multiplier, not a crutch. Until then, focus on technique, not tech.
Step 4: Capturing Lifestyle Shots
Once I had clean, well-lit photos on a consistent background, my shop finally started to look legit. But here’s what really pushed my listings over the edge: lifestyle photos.
These shots show your product in use, in a real-world setting—or at least something that looks real enough to connect with a buyer’s imagination.
When I added even a few of these photos to my listings, I noticed a clear bump in clicks and conversions. Why? Because lifestyle photos build trust and help shoppers imagine the product in their life.
What Is a Lifestyle Product Photo?
- It shows your product being used or placed in context.
- It creates an emotional response or tells a story.
- It helps buyers understand scale, mood, and fit—especially for items like home decor, jewelry, clothing, or accessories.
For example:
- A candle on a styled coffee table → cozy vibes
- A necklace being worn by a model → shows size + elegance
- A cutting board with vegetables on it → instantly signals quality + function
My DIY Lifestyle Photo Setups
I didn’t have a studio, model, or big house. But I worked with what I had.
Here’s how to pull it off:
Setup #1: Cozy Corner
- Product: Handmade journals
- Scene: Neutral blanket, mug of tea, natural light
- Why it works: Gives off a calm, self-care vibe that fits the ideal target customer
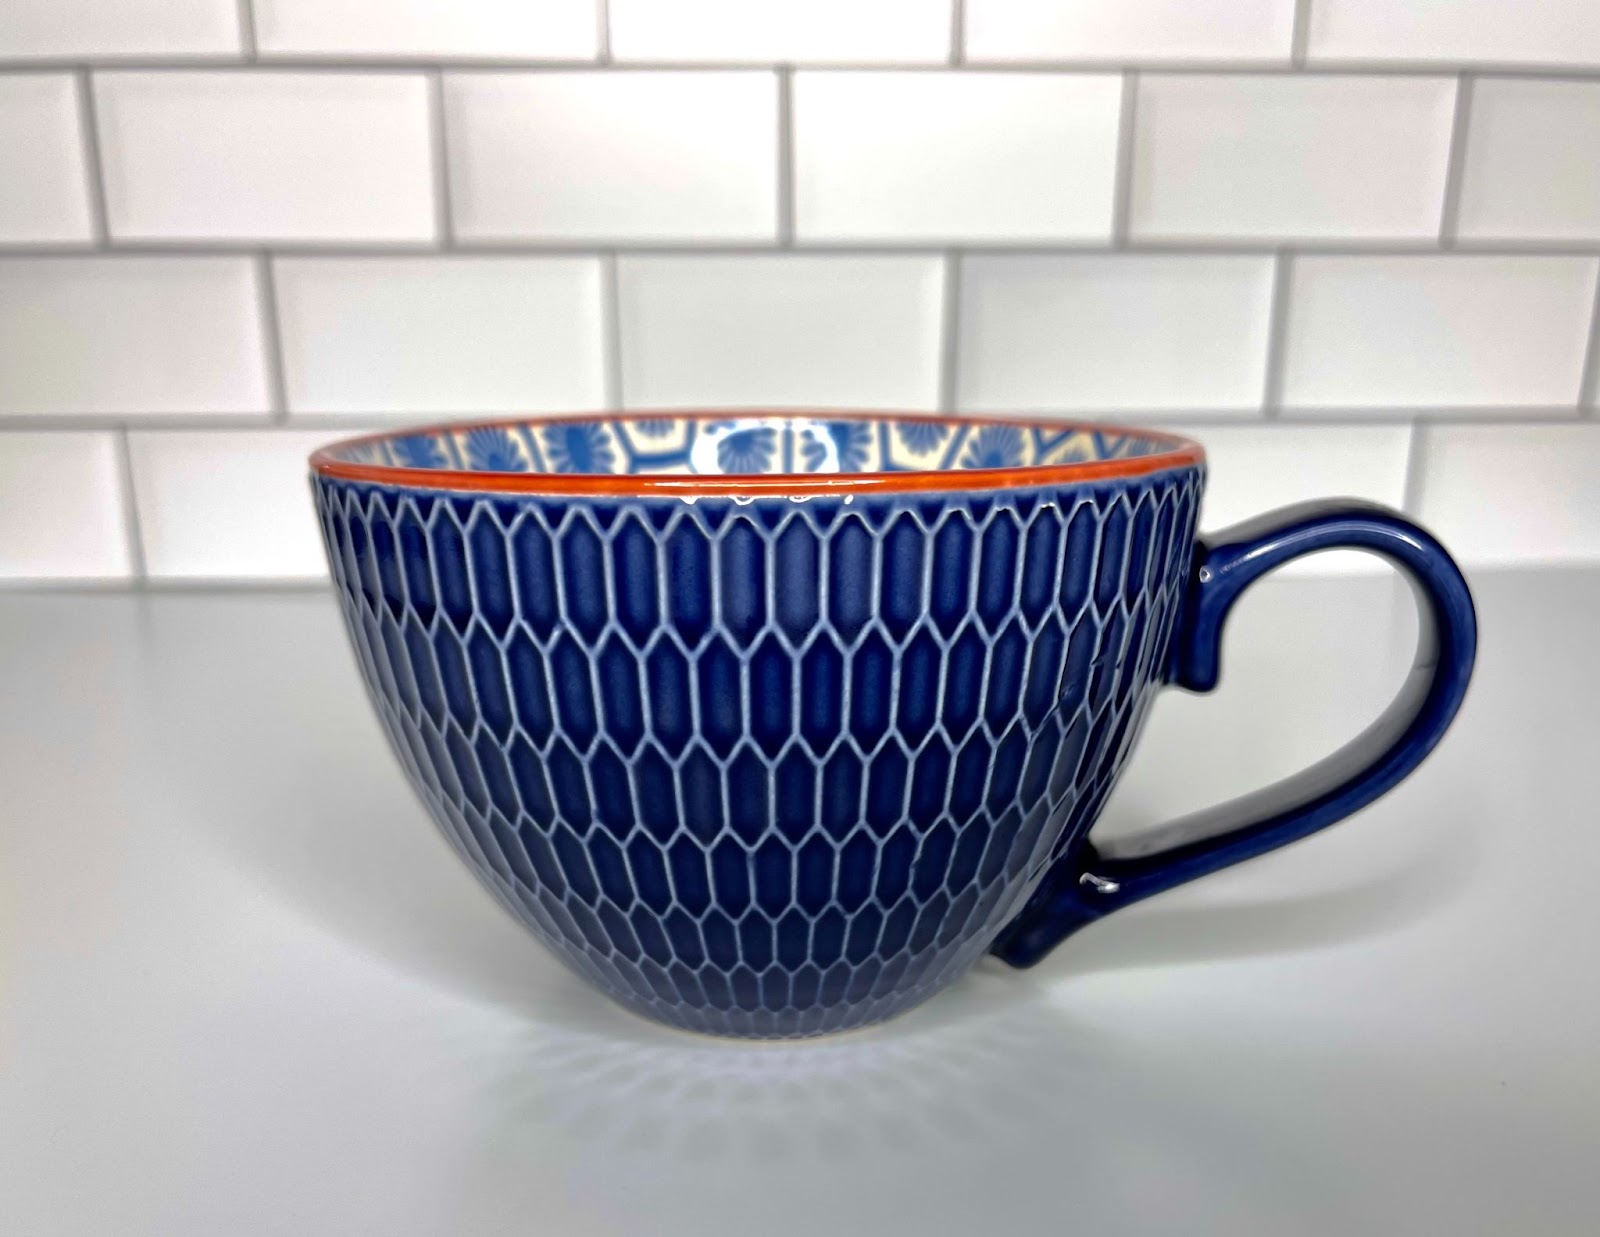
Setup #2: Kitchen Counter
- Product: Recipe cards
- Scene: White subway tile backsplash, mixing bowl, flour on the surface
- Why it works: Looks authentic—like the product belongs in a real kitchen
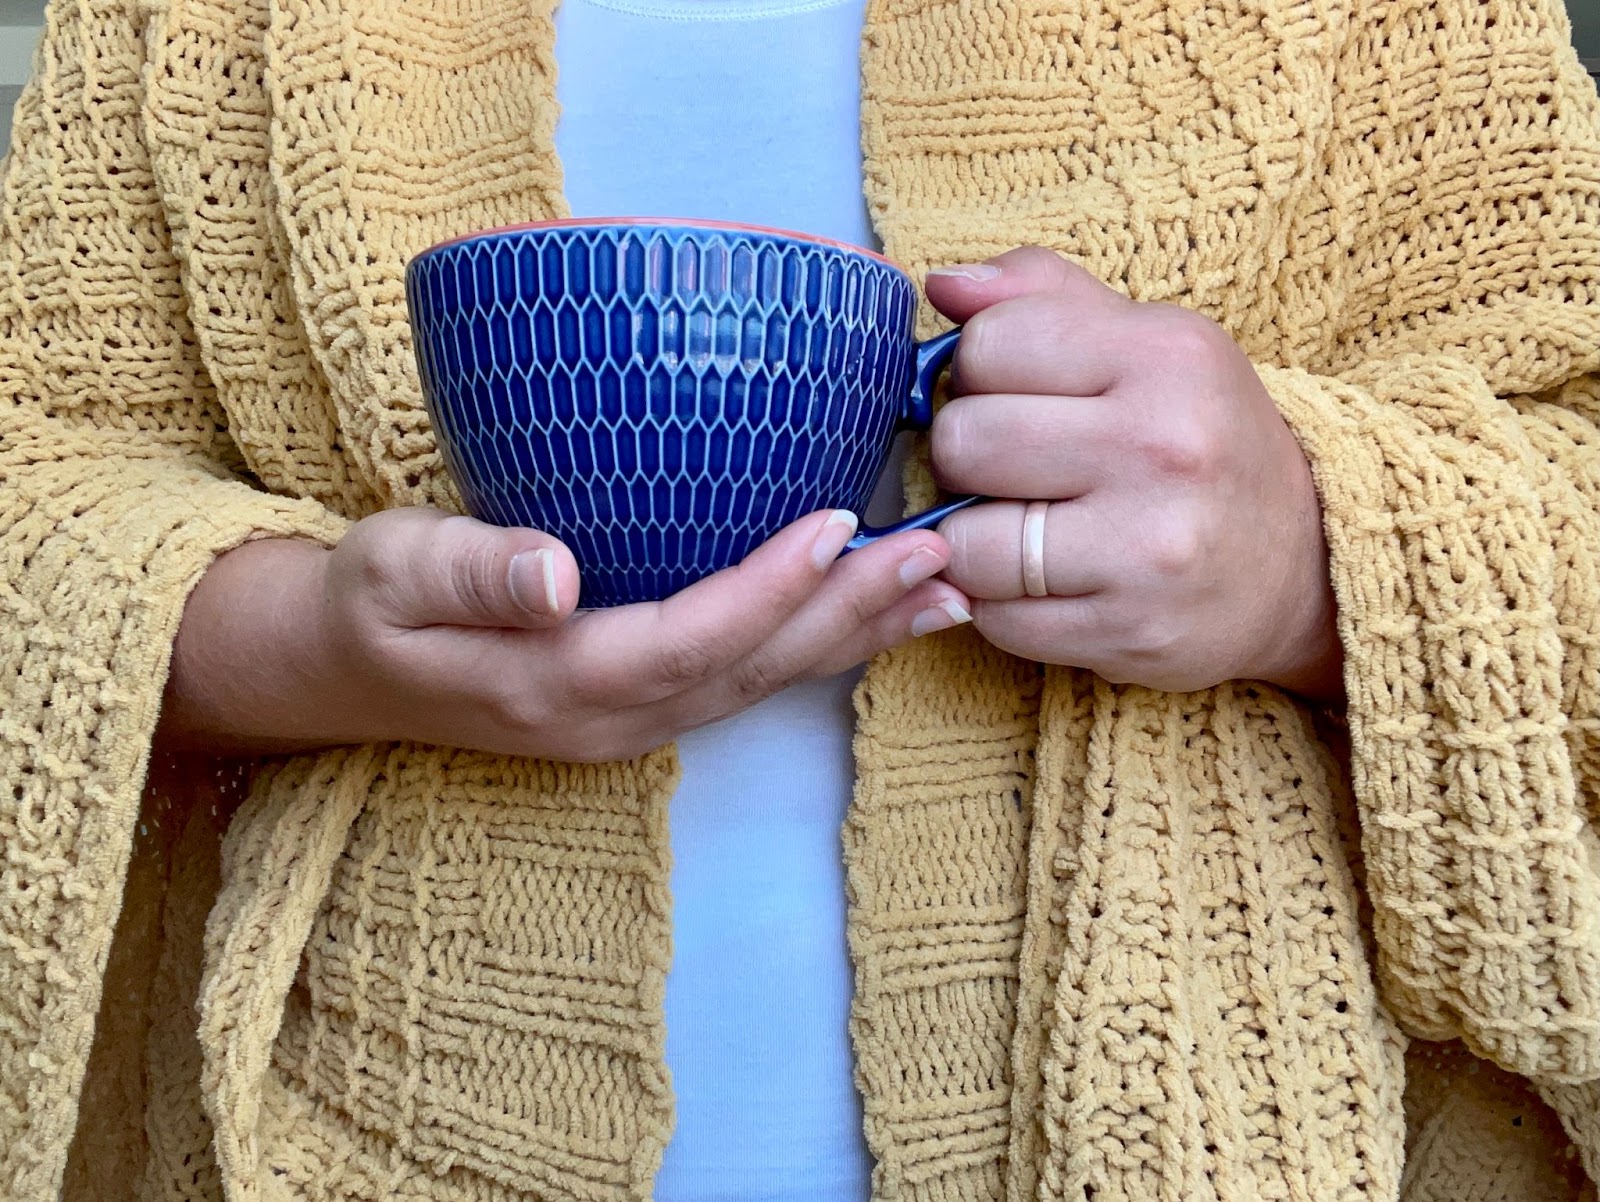
Setup #3: Human Element
- Product: Jewelry
- Scene: Your own hands holding the earrings against a neutral background
- Why it works: Shows scale, and having a human touch adds trust
Pro Tip: You don’t need a model. Use your hands, a friend, or even a mirror setup. Just make sure the background stays simple and the lighting matches the rest of your shop.
What to Keep in Mind When Shooting Lifestyle Photos
- Stay on brand: Don’t stage a farmhouse-style photo if your shop is sleek and modern.
- Use natural props: Real plants, wooden trays, fabric textures—keep it minimal and cohesive.
- Plan your shots: Sketch out or list what story you want each shot to tell.
- Focus on your product: Lifestyle doesn’t mean chaotic. The product still needs to be the hero.
If You’re Ready to Go Pro…
- Hire a part-time model (Etsy sellers often use friends or local creators)
- Invest in styled stock photo scenes or backdrops from shops like Replica Surfaces or Social Squares
- Batch shoot multiple listings in one setup to get more value out of your styled scenes
Why Lifestyle Photos Matter
Let’s be real: your competitors are doing this. If your listing has only plain white background photos, and theirs shows the product styled in a real space with a relatable feel, you’re probably going to lose the click—even if your product is better.
You don’t need 10 lifestyle shots per listing. One or two well-done photos can make a massive difference in how professional your shop looks and how connected your buyer feels.

Step 5: Adding Etsy Listing Videos + Behind-the-Scenes Content
This was the step I put off the longest.
I figured video was optional. I assumed I needed fancy editing software. I told myself buyers didn’t care.
I was wrong on all three counts.
Adding video to my Etsy listings and creating simple behind-the-scenes (BTS) content helped boost engagement and trust—and it didn’t take a film degree to do it.
Why Etsy Video Matters
- Etsy prioritizes listings with videos in search (more time-on-page = better performance)
- Buyers get to see your product in motion, which builds trust
- You can answer questions before they’re asked (size, texture, how it’s used)
- It’s one more chance to visually brand your shop
Etsy has publicly said that videos increase buyer confidence—and that confident buyers are more likely to convert.
What I Record for My Listings
I started simple. One 15-second video per listing. No music, no fancy transitions.
Here are my three go-to styles:
1. Product in Motion
- Slowly rotating the item on a neutral background
- Close-up panning of texture (e.g., fabric weave, engraving detail)
- Someone opening/closing the item (jewelry box, card, planner)
2. In-Use Demo
- Me lighting a candle
- A customer model putting on earrings
- A shirt being folded to show the fabric weight and movement
3. Quick Lifestyle Loop
- Product in its styled setting with slight movement (leaf rustle, flickering candle, hand enters frame)
Pro Tip: Keep your videos at about 15 seconds. Etsy loops them, so use that to your advantage—smooth, continuous motion works best.
BTS Content That Gets Views (And Builds Trust)
When I started posting quick behind-the-scenes content on Instagram Reels and YouTube Shorts, I saw more engagement—not just on social, but on Etsy too. People love seeing what goes into making a product.
Here’s what I shoot:
- Order packing videos: These are always a hit. I film myself wrapping an order, sealing it, and adding a thank-you note. I add a caption like “Every order packed with care.”
- Workspace tours: Short clips showing where the magic happens. Even if it’s a corner of a spare room, people love the personal connection.
- Making the product: Time-lapses of the process (e.g., stamping, painting, assembling) give buyers a glimpse into your craftsmanship.
- Etsy packaging videos: If your branding is on point, this shows off your full unboxing experience.
Tools I Use to Shoot Video
Entry-Level (What I started with):
- iPhone or smartphone
- $25 tripod with an adjustable phone mount
- CapCut app (free) for trimming, speeding up, and adding text overlays
- Good lighting—I just reused my photo setup
Pro-Level upgrades:
- Mirrorless camera (Fuji X-T4) with clean HDMI for livestream or 4K shoots
- LED panel lights with adjustable color temperature
- Lavalier mic for voiceovers or ASMR-style sound (great for packing videos)
- Final Cut Pro / Adobe Premiere Pro for more polished edits
Editing Tips
- Start and end with your product centered and clear
- Use jump cuts if you’re packing or demonstrating steps
- Overlay quick captions to explain what’s happening
- Keep background noise low—or overlay simple music for Reels/Shorts
Where I Use the Videos
- Etsy Listing Video Slot: Upload the best version here
- Instagram Reels: Short and raw works great—no need for perfection
- Pinterest Idea Pins: Upload behind-the-scenes videos to show your process
- YouTube Shorts: Repurpose your Reels in a vertical format with a strong title
Don’t underestimate the power of a well-lit, simple video. It adds life to your product, gives your buyer more confidence, and sets your shop apart.
Step 6: Editing and Exporting
This is where your good lighting and clean composition pay off.
When I first started editing my Etsy product photos, I thought I had to use filters to make them “pop.” Big mistake. Filters can distort colors, blow out highlights, and make your products look completely different than they do in real life.
And that leads to returns. Or worse—bad reviews.
Now I stick to one rule: edit for accuracy, not aesthetics.
My Simple Editing Workflow

1. Crop + Straighten
- First, I trim the frame to center the product.
- I use Etsy’s recommended ratio: 4:3 horizontal for thumbnails.
- I turn on gridlines to make sure everything is straight—crooked images look rushed.
2. Adjust Brightness & Contrast
- I increase brightness just enough to make the product pop.
- A slight bump in contrast helps define edges and depth without making it look harsh.
3. Fix White Balance
- This is crucial. If your whites look yellow or blue, your photo’s off.
- I use a white object (like my backdrop) as a reference and correct the temperature accordingly.
- Tools like Lightroom, or even your phone’s native editor can fix this.
4. Sharpen
- I lightly sharpen the photo to bring out detail—especially on textured products like fabric or metal.
- Be careful not to overdo it or you’ll get a grainy look.

Tools I Use
On My Phone (Entry-Level):
- Lightroom Mobile: Free version is excellent. You can even save presets to use across all your photos for consistency.
- iPhone Native Editor: Surprisingly solid for brightness, crop, and color.
On My Desktop (Pro-Level):
- Lightroom Classic: Best for batch editing if you have dozens of photos.
- Photoshop: I only use it when I need to clean up dust, smudges, or distractions in the background. Not ready for photoshop? Here are some alternatives.
- Capture One: Great for color accuracy if you’re in a controlled studio setup.
Pro Tip: Save your edits as a preset or “recipe” to keep a consistent look across all your listings.
Export Settings That Matter
When you’re done editing, don’t just smash that “Save” button and call it a day. Your export settings affect both image quality and loading speed—which impacts SEO and buyer experience.
Etsy Image Recommendations:
- JPEG format
- Minimum 2000px on the shortest side
- Under 1MB in file size if possible (so your listings load quickly)
- 72 dpi is standard for web
In Lightroom, I export at 80–90% quality to get the best balance of clarity and file size.

Writing Alt Text for SEO (and Accessibility)
This step is often overlooked—but it’s important.
Alt text is what screen readers use to describe an image to visually impaired users. It also helps
Etsy and Google understand what your image is about.
Here’s how I write mine:
- Keep it short, natural, and descriptive
- Mention the product and key details
- Avoid keyword stuffing
Here’s an example:
- Bad: “handmade gift unique Etsy boho handmade best candle jar”
- Good: “Small handmade soy candle in an amber glass jar with white label”
Bonus Tip: Include keywords like “Etsy product photography” and variations naturally in your alt text when possible.
If you do this right, your images will look clean, fast-loading, and professional. They’ll show up better in Etsy search, give buyers more confidence, and make your shop stand out.
Step 7: Final Touches for Etsy Visual Branding
Once I had good lighting, a clean backdrop, clear photos, and video content—it felt like I had most of the pieces in place.
But something was still off.
That’s when I realized: I didn’t have visual branding.
My photos looked decent on their own, but as a group? Inconsistent. Some were warm, others cool. Some had props, others didn’t. It was like a patchwork quilt of decent efforts—not a unified brand.
So I fixed it.
Here’s how you can pull it all together, too.
What Is Visual Branding on Etsy?
Visual branding is the style and mood your images communicate—before someone even reads your listing title.
Your thumbnail, background, colors, and props should tell a cohesive story across every product you list.
Think of your shop as a catalog. If a buyer clicks from one listing to another and it feels like a completely different brand, you’ve lost visual trust.
How I Tightened Up My Visuals

1. Defined My Brand Look
- I picked three words that describe the vibe I wanted:
Clean, warm, handmade. - Then I reviewed every product photo I had and deleted anything that didn’t fit.
2. Created a Photo Style Guide
Yes, like an actual mini guide just for me. It included:
- What type of lighting to use (natural with slight warmth)
- Which backgrounds were allowed (white sweep, linen texture, rustic wood)
- Where to place the product in the frame (centered, rule of thirds for lifestyle)
- What props were OK (neutral mugs, soft fabrics, one houseplant max)
Having a standard made batch-shooting way easier—and made my shop look 10x more professional.
3. Added a Branded Final Image to Every Listing
I added one image to the end of every carousel that included:
- My shop name or logo (subtle, not salesy)
- Sizing or product care info
- Packaging details or a message like “Packed with care by [Your Name]”
This image not only answered FAQs—it became part of my visual brand identity. Buyers told me they felt more confident purchasing because it made my shop “feel real.”
What to Include in Your Etsy Product Photo Lineup
Here’s the photo format I follow for every listing:
- Main Thumbnail: Crisp, centered, well-lit, no props—just the product
- Angled Detail Shot: Slightly off-center to show depth and dimension
- Lifestyle Image: In context, styled with minimal props
- Close-Up: Shows texture, stitching, grain, etc.
- In-Use / Scale Shot: Handheld or next to a familiar object for size reference
- Packaging Image: Shows how the product arrives (great for gift-givers)
- Branded Info Card: Includes logo, sizing chart, or care instructions
Color Consistency Matters
When shoppers scroll your shop, your thumbnails should feel unified. If one is too cool-toned and another is overly saturated, they’ll look mismatched—even if the photos are technically fine.
This is where Lightroom presets or a saved editing “recipe” can help.
Pro Tip: If you’re not sure what your brand colors are, take a screenshot of your listing thumbnails side-by-side and ask:
“Do these look like they belong to the same shop?”
Final Touch: Make Your Shop Banner Match Your Product Vibe
Last but not least, I updated my shop banner and profile picture to match my photography style—same tones, same mood. That extra polish made everything feel intentional.
By the time I implemented all these visual branding tweaks, buyers started messaging me things like:
- “I love your aesthetic.”
- “Everything in your shop looks so cohesive.”
- “I could tell from your photos that this would be high quality.”
That’s when I knew: the work paid off.
Over to You: Final Advice for Sellers
If you’ve made it this far, here’s the big takeaway:
You don’t need a professional studio, expensive gear, or a design degree to create click-worthy, conversion-boosting Etsy product photography. You just need a bit of strategy, consistency, and the willingness to work with what you’ve got.
Every step I shared—finding good light, creating a clean backdrop, shooting lifestyle photos, adding video, and polishing your visual brand—was built around solving real seller problems with simple tools and repeatable systems.
If your listings aren’t getting clicks, start with your photos. They’re the first thing buyers see, and often the only thing they use to make a decision.
Here’s your action plan:
- Pick the best natural light in your space—and protect that time daily for shooting
- Create a permanent or semi-permanent setup so you’re not reinventing the wheel each time
- Use consistent backgrounds and props that match your brand
- Add at least one video and one lifestyle shot per listing
- Write descriptive, SEO-friendly alt text for every image
- And most importantly—keep iterating. Your first batch won’t be perfect. But each round of improvements gets you closer to a shop that not only looks professional but performs like it too.
You already have what it takes. Now you’ve got the playbook. As always, happy selling!
→ Like the tips in the article? Check out the complete series below!
Everything You Need to Know Before You Start an Etsy Shop:
- How to Do Etsy Market Research for Your Products
- Know Your Etsy Shop Branding Before You Open
- How to Create & Maintain an Etsy Shop Aesthetic
- How to Master Your Etsy Product Photography
- How to Research Etsy Keywords
- Etsy Shipping Costs and How to Calculate Them
- A Crash Course to Etsy Taxes & Accounting
- The New & Improved Quick and Dirty Guide to SEO for Etsy
